Sunday, September 30, 2007

Ramblings and my verse for the week


As things have gotten pretty busy lately its nice to stop for a moment and reflect. I love putting verses that "speak" to me on scrapbook pages. Its eaiser to read than my hand writing lately. lol And when ever I need a quick bible fix all I have to do is click my mouse and read some of my pages. This verse is a great reassurance to me as a scramble through my day trying to do 5o million things at once and never doing anything well. I feel so much better when I remember yes God is with me. He is the one who gives me strength and he will help me. And when I think I just cant do anymore he will lift me up and probably tell me rest.
I went through and posted the Friday Filter Challenges for October and November. Lots of fun ones. Stop by on Friday to check em or join in!

Saturday, September 29, 2007

A New lay out


I finally got a chance to scrap. So here's a lo with the photo from my latest filter challenge glowing edges. I've been having a lot of fun trying different things with the filters and finding out what works and what doesn't. I will try to post tomorrow with next month's list of filters. Gotta go I've got to get to bed at a decent hour for once!
Have a great day!
Journaling reads
The moment your big brother headed off to school you had to try out the new skateboard. It is so enjoyable watching you do your “tricks”. At only two years old you are quite the daredevil! so energetic and full of life.
fonts used: bungnipper, earwig factory, oedipa, adobe carlson pro

Friday, September 28, 2007

FILTER FRIDAY CHALLENGE - GLOWING EDGES


Its Friday again! That means its time for the Friday PSE Filter Challenge! This week we are using the glowing edges filter. You can find it under filters, stylize, glowing edges.


Here is my original photo

There is no need to choose foreground or background colors for this filter. Once you have your layer selected choose glowing edges. You will receive a screen with options for adjusting the edge width, brightness and smoothness. When your satisfied click ok.


Here is my end result


I had a lot of fun playing with this filter and was rather suprised by the results.

Want to join the challenge? Leave a comment with a link to your photo.

Remember there are no deadlines! Jump in whenever you want!

Have a great weekend!

Wednesday, September 26, 2007

HOW TO CREATE AN ANIMATED LAYOUT

Photo Sharing and Video Hosting at Photobucket


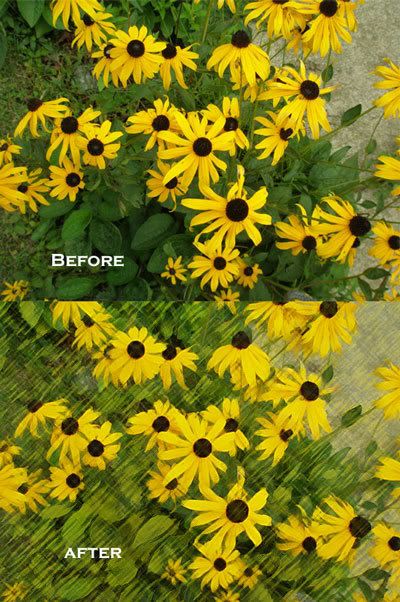
The first time I saw an animated layout I was amazed and had no idea how to do it. Until yesterday when I discovered that PSE does animation. A little light bulb when off and I spent the day trying to figure this out and I will share what I learned with you. You could have several different photos with animation on the same page but I will explain how to do just one.

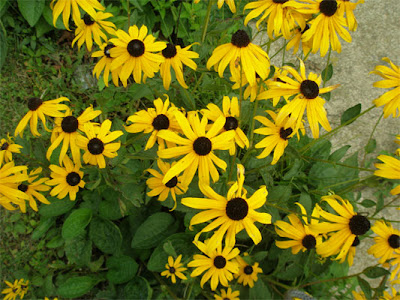
The first step and maybe the hardest step is choosing your photos. You want to look for pictures taken in a row, at least two but you could probably use as many as you want.

Create your layout. You will use the exact same layout for every photo. When I did this I made sure all my photos were the same size and in the same position.

You will have to save your layout for with each photo separately. I only used two photos so I ended up with two layouts.


The next step is animation.
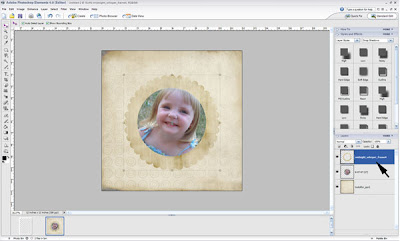
In Pse create a new layer.
It needs to be 4x6 or smaller.
Simply place your layouts in the order you would like them to be seen.
The first layer relative to the first layout.
Once you have all your layers in order click save for web.
Its under the file tab.


Once there you need to select the gif option.

Check the box for animation.

Resize if necessary.

Check the box that says loop.


And you also have options for the duration of each frame. You can play with this and see what works best.


Click ok and you have created your very own animated layout! You can get as creative as you want and animate your text or elements basically anything you can do with those animated blinkies you can do on your scrapbook page.

I hope this tutorial was useful to you. Now go on get animated!

Check out the layout that inspired me to try out animation here. Fonts used: Swordfish, Oedipa

Tuesday, September 25, 2007

Shabby Autumn Quick Page Freebie


I have a quickpage freebie for you today! I have the kit in the store now. I still have not figured out my file hosting troubles so there is still nothing on ebay. I have a new kit I'm working on that will hopefully be done this weekend.

The layout is featuring my youngest son who is a little too attached to his pumpkin this year. He says it has powers and talks to him. I wonder if I should be worried? haha


sorry download expired

fonts used : love letters, georgia

Monday, September 24, 2007

Preview


I added a few things to the Shabby Autumn Kit. A few tiny bows, some brads and a ribbon. I was planning on having my new kit ready today but I am having problems with my file hosting. So until the problem is resolved or I find a new host I won't have anything available on ebay. You can always find my designs over at Digital Scrapn Designs and I plan to have this kit on there by tomorrow nite.

Sunday, September 23, 2007

Shabby Autumn

Hello!
Just want to thank everyone who participated in the naming of my latest kit. I choose two names. From Kansas A, and Hummie you will receive this kit! As soon as it is renamed and packed up I will send you a link. Thanks everyone!

Friday, September 21, 2007

FILTER FRIDAY CHALLENGE

Well its Friday again! Woohoo! Time for the filter challenge. This week we are playing with the mezzotint filter. I had never heard of mezzotint before this challenge so I thought I better find out more before I try to replicate it in my program. I found an interesting article about mezzotint and you can read it here.
If you have never used the mezzotint filter before you can find it under Filters, pixelate, mezzotint.


Mezzotint uses the colors in your photo (as far as I can see), so there is no need to choose foreground or background colors.

I choose to use a black and white photo.


Once you have your photo selected choose the mezzotint filter. You will then receive a screen like this.


You have several options to choose from. I choose long lines. Then click ok. You're done!

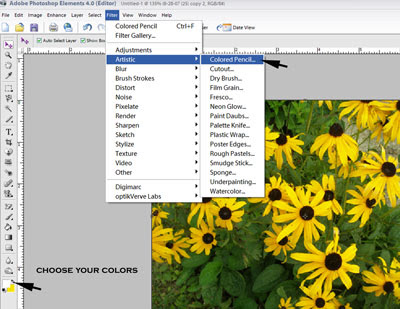
Now the reason I choose black and white was because I really didn't like how the colored photos turned out. I didn't like how photos of people looked either. Which is why I chose this photo. However I had to try it one more time just to see.

Trying this effect again I can see it would probably work better with close up shots. I realize this isn't the best photo. But now I know what to look for when choosing my next photo.

I hope you enjoyed this filter challenge. If you'd like to share your photos or layout using this filter please leave a comment with your link or send me an email as I will be adding a list. Remember there are no deadlines. Jump in any time!

Have a great weekend!

See what others did with this challenge

Amy

Thursday, September 20, 2007

There's Still Time

Hello! Just want to put out a reminder that tomorrow is Filter Friday (pse). This week we will be playing with the mezzotint filter. You can find it under Filters, pixelate, mezzotint. Before this challenge I never heard of mezzotint so this should be pretty interesting. So get your photos ready to show off! And check back tomorrow for more on that.


One day left to help name this kit. If I pick your name you can have it for free. For more details click here.

Also still looking for a few more people who would like to try my kits out for free. All you have to do is give me a little feedback. Interested click here.

Hummie's Themed Thurday - Gentle

I can't believe its the afternoon already! Amazing how some days fly by. This lo is for Hummie's Themed Thursday. This week is gentle. I used Romantic Roses elements and papers found at computerscrapbook.com by, Kristine Bents,Jessica Safty, Rebekah Jennings. Its a beautiful collection of grungy girly stuff. I love it! Fonts used: A yummy apology, Alpha Thin.

Wednesday, September 19, 2007

Hp Creative Scrapbooking Assistant - Review

Great for the beginner? When I first discovered digital scrapbooking I used Hp Creative Scrapbooking Assistant. Its a very inexpensive way to get started in digital. I picked up my copy on ebay for around $8 including shipping. A new copy is about $30 plus shipping.
The program has a great demo that tells you exactly how to get started. Which is great as with most products it takes a little while to get used to. It has been I while since I've used this program. After looking at it now it seems a little bit clunky and slow.
It has themes and allows you to import your own designs. You can create shapes or frames. There is no option for adding drop shadows to elements. Also included are quotes. It has options to turn photos and elements sepia or black and white. But that's about it when it comes to editing. Hp Creative Scrapbooking Assistant is for making pages or cards.It is not for someone who wants to be a digital designer.
Qvc calls it the serious scapbookers secret. I doubt it. Once I really started to get into digital and printing 12x12 I found out the quality isn't that great. It doesn't give you any options for saving. It automatically saves at 150dpi(it didn't tell me that I had to figure it out). Which is fine if you are going to print from a standard printer. I have printed many layouts this way and they turned out beautifully. How ever if you want to print 12x12 then this is not the program for you.
Overall I feel Hp Creative Scrapbooking Assistant is a good choice if you are just starting out and don't want to invest a lot of money, and print from your standard printer. I would not recommend paying full price for this product. I'd spend a little more and get something with more options that can grow with you.

Tuesday, September 18, 2007

Bob Dylan Sent me a message!

I saw this on princess crafts and thought it was pretty cool. So I had to make my own. hehe

So nice of Bob to help spread the word!

Try it for yourself here

Monday, September 17, 2007

Name this kit and you can have it for free

Well as promised, if you can help me name this kit you can have it. Please leave a comment or drop me an email at rachel5576@yahoo.com with your suggestion. If I choose your name its yours as a thank you!
This kit includes
7 patterned and textured papers
3 textured solids
2 tags (crumpled)
3 frames
3 arrows
4 crumpled word tags
3 crumpled blank tags
1 star overlay
3 scalloped borders
1 alpha upper and lower including numbers and punctuation

Please submit your suggestion by Friday!
Thanks!

Sunday, September 16, 2007

Faithbooking


A few months ago I started a prayer journal on my computer. As a way to make my devotional time a little more exciting and help commit some verses to memory I started scrapping them. Now I must admit i haven't been doing this as often as I want or should...like most things in my life. But I thought I would start sharing some of my favorite ones here on Sundays. This is my version of faithbooking. I need to do some more research on that subject. I know Hummie has a section of that on her site so I'll have to check that out. Maybe soon I'll start finding photos for my verses. Thanks and hope you enjoy!
Credits
Miss Mint -peppermint creative Spring jellybean kit
font georia
biblegateway.com

Friday, September 14, 2007

Constructive Criticism Team Call!

Wanna try my stuff for free? I'm looking for 3-5 people who want to try my kits out. In return all I ask for is a little constructive criticism. Tell me what you like what you don't and what you might like to see or maybe even take away. If you are interested please drop me a line a rachel5576@yahoo.com please put cc team in the subject line.
Thanks have a great weekend!
Want to check out my designs before you sign up? You can here

Filter Friday Challenge Diffuse Glow

Welcome to the Friday Filter Challenge! This week I challenge you to try out your diffuse glow filter.

Before

After

In case you don't know where to find the diffuse glow filter, you can find it under filters, distort, diffuse glow. You will also need to choose your background color before you use the filter. I used white.


Once there you can adjust the settings. Click ok and your done. Of course if you don't like how it turned out you can always click undo. Isn't digital great!

I've been racking my brain trying to figure out why or what you might do with a different color glow. It took me a while to find something I kinda liked. Here is my little experiment.

Here is my original photo

I used a shade of pink as my background color. And a soft glow.

I ended up with this.


I thought that was a little too harsh so I reduced the opacity to 73%. The original being the bottom layer.

Final Photo

Think that's a pretty cool effect. I'm not sure how often I would use it, but I'd love to see what you come up with!

Wanna join the challenge and share your ideas? Simply leave a comment with a link to your photo.

Have a great weekend!

Check out what others did with this filter

Hummie

Thursday, September 13, 2007

Hummie's Themed Thursdays - Explore

I have a tendancy toward simple layouts. And the papers have to coordinate with the clothing or I have a really hard time.LOL! But thats just me I guess. This is my oldest at around 6 or 7 months exlploring in our backyard.

credits:
Blue floral ppr by Beth Nixon Dsp
Font Georgia


Sunday, September 9, 2007

Friday, September 7, 2007

Filter Friday Challenge Colored Pencil

Photo Sharing and Video Hosting at Photobucket


Ok I know this is a new thing so jump in whenever you want to. Today lets explore the colored pencil filter.


Here is my original photo


In case you are unfamiliar with the location of this filter, you can find it under filters, artistic, colored pencil. Its important to choose foreground and background colors to achieve the results you are looking for. I used my eye dropper and choose two colors from my original photo. You will want to do this before using the filter. The colors in this preview are not the exact colors I used.


When ever you are working on photos its a good idea to make a duplicate copy first so you can start over easier if necessary or create different effects. An easy way to do this is to click on the layer you wish to duplicate and hit control and j at the same time. I will be using two layers to get the effect I'm looking for.

Once you have selected the colored pencil option you will receive a screen that looks like this. From here you can adjust the pencil width, stroke pressure, and paper brightness. When you are happy with your results click ok.

This is how my photo turned out.

I wasn't completely satisfied with the results I wanted a little softer look. So I reduced the opacity of the colored pencil layer to about 50% with that layer above the original.


Lets see want you come up with using the colored pencil filter! If you'd like to share please leave a comment with a link to your photo from your blog or gallery. Thanks for stopping by!

Digg!

Fab Filter Fun Friday!

Today starts the first of a new weekly series called Fab Filter Friday! I will be going through the PSE filters and challenging you to do the same. I will be posting a photo or layout with the weekly filter and you can leave a comment with a link to yours from your blog (please use a permalink if linking from your blog) or gallery. I also will be listing fabulous finds or fun ideas. So Stop by on Fridays for fab filter fun!

Thursday, September 6, 2007

Hummie's Themed Thursdays - Overflowing

This is my layout for hummie's themed thursday this week. It is of my oldest son jacob at a trip to the beach in door county, wi this summer. As you can see he had a great time!

credits:
font: a yummy apology
painted journaling stripe Melany Violette Simply Clean Digi Scraps
Funky Florals ppr Jeanine Baechtold computerscrap
fiesta ppr rachel clark designs

Wednesday, September 5, 2007

Product Review - Virtual Photographer

Well hello everybody! This Wednesday will be the first of a new regular column. Wednesdays are now product review days. So come back every Wednesday to find out what products I like or don't like.

This week I will be sharing a really cool photoshop plugin called Virtual Photographer presented by Opitkvervelabs . Oh and did I mention its absolutely free! Love that!

Virtual photographer is a very easy to use and install product. Once you have it installed (they have very easy to follow instructions on there site here). Simply click on your filter tab and scroll down to optikverve labs then click on Virtual photographer. This is what it looks like when opened.


The options are amazing! If you click on the tab "presets" you will get a pull down menu that has several options for color or changing to black and white. On the right side you can adjust the levels of of softness and color. You can customize it to get the look you really want.

There are so many differnet filters I can't show you all but here is and example of one.


The only downside to these filters is some tend to make the photo a little too blurry depending on the size. Another thing if you are working in layers any open space around your picture will be filled with your background color. So if you are working on a scrapbook page you will need your marquee tool or eraser to remove that. Other than that I would highly recommend it. I use it all the time.

Check it out here.

Fridays are going to be Filter Fridays. I will be posting pictures or layouts using different filters.

Sunday, September 2, 2007

Using Group with Previous in PSE

Did you know you can easily change the look of a frame or tag or just about any of your scrapbooking tools in pse by using group with previous? Well you can and I'll show you how.

Step one:

Select the layer/item you would like to change


Step Two:
Under the File Tab hit place and select the paper you would like to use.


Step three

If you followed steps one and two your paper should be directly on top of the item you want to change. Make sure this layer is highlighted.

Simply click on layers at the top and scroll down to group with previous.


Voila your done! You can move this layer around to make it more pleasing. Once you are happy click on layers and merge down. Not you can easily move your new element anywhere you want.


Have fun!

Digg!